Basic Navigation with Caliburn.Micro

** There is an excellent blog on Navigation with  detailed information on each class and different styles @ devlicio.us for CM **

In the previous blog we look at how to do page navigation with Jounce. Today we will look at how to implement the same thing in Caliburn.Micro. The requirement is same.

I. Create a web page with two buttons and a container panel. The first buttons says ‘Hello World’ and second button says ‘Hello World1’.

II. Create two pages, with one page says ‘Hello world’ and the second page says ‘Hello World’.

III. Wire up the button events in such a way, when a user click the ‘Hello World’, it displays the page with ‘Hello World’ in the container panel. When the user presses ‘Hello World1’ button, it replaces the ‘Hello World’ page with ‘Hello World1’ page.

This is exactly the same requirement of our Jounce example. So how would we go about doing it? We start from what we learned from our ‘Hello World’ example.

I.Create web page with its contents:

Follow the steps specified in ‘Hello World’ example and create the simple Caliburn application. Make sure it compiles and runs. Lets add the button and content control to hold the panel to host the dynamic page by adding the following code to the ShellView.xaml

<Grid Background="White" d:DataContext="{d:DesignInstance sampleData:SampleShellViewModel, IsDesignTimeCreatable=True}">
        <Grid.ColumnDefinitions>
            <ColumnDefinition Width="161*" />
            <ColumnDefinition Width="194*" />
            <ColumnDefinition Width="163*" />
        </Grid.ColumnDefinitions>
        <Grid.RowDefinitions>
            <RowDefinition Height="34*" />
            <RowDefinition Height="253*" />
        </Grid.RowDefinitions>
        <Button Content="Hello World" Name="HelloWorldButton" Grid.Row="0" Grid.Column="0"/>
        <Button Content="Hello World1" Name="HelloWorld1Button" Grid.Row="0" Grid.Column="2"/>
        <ContentControl Grid.Row="1" Grid.ColumnSpan="3" Name="ActiveItem"/>
    </Grid>


We have added two buttons, in row 0, column 0 and 2. First button shows ‘Hello World’ and the second one shows ‘Hello World1’ as the requirement. The third control we added is ‘ContentControl to show a single content. It is named as ‘ActiveItem’. This name is important and we will come to that soon. Other than that, there is nothing special in here, the button have Name associated with it, which is nothing but caliburn convention to bind to a method for click event  in the view model. With XAML added your design time screen should look like the following

image

II. Create two pages to display ‘Hello World’ and ‘Hello Word1’:

Add two new Silverlight Pages (you can also use Silverlight User Controls if you want). Call it Page1View and Page2View. Remember, it is important to end all the view with ‘View’ and ViewModels with ‘ViewModels’. Caliburn uses convention to find and bind the View with ViewModels. Add a text block in each of the page to distinguish which page it is. So the page1view XAML would look like the following

<Grid x:Name="LayoutRoot">
        <TextBlock Text="Hello World"/>
    </Grid>

While the Page2view.xaml would look like this

<Grid x:Name="LayoutRoot">
        <TextBlock Text="Hello World1"/>
    </Grid>

Now that we have views, it is not over. Caliburn relies on ViewModel to do the routing, so create two classes with Page1ViewModel and Page2ViewModel. Both will be nothing but empty classes. You do not need to add any code. There is also different way to approach this same two screens, since I want to keep it simple, I am not going to discuss about them here yet.

III. Wireup the events to load pages:

Now that we have Shell to display the main page, two separate pages which display ‘Hello World’ and ‘Hello World1’. We need to wire up the button click events to activate appropriate page and display them in the content panel named ‘ActiveItem’.  As you know by now, when you click a button, Caliburn will look for a method name with exact name of the Button. So Lets look at the button name of ‘Hello World’, it is called ‘HelloWorld’ (with out space between hello and world). We need to write a method in the shell view model to activate the page1 and display it. To do that. we write the HelloWorld method as follows in the ShellViewModel.cs.

[Export(typeof(IShell))]
    public class ShellViewModel : Conductor<object>, IShell 
    {       

        public void HelloWorldButton()
        {
            ActivateItem(new Page1ViewModel());
        }

        public void HelloWorld1Button()
        {
            ActivateItem(new Page2ViewModel());
        }
    }

That’s it. Now if you would run the application, you will get to the main page

image

now if you would press ‘Hello World’ button, it displays the Page1View in the content panel

image

If you would press ‘Hello World1’ it displays

image


So if you notice, we did not write lot of code to achieve the simple page navigation. In fact, the pages we created to display the ‘Hello World’ and ‘Hello World1’ do not have any clue about this will be placed on a particular panel or the page by itself did not say anything about it is being used to display somewhere. All the navigation work is done at the Shell level and nothing at the page level.  Couple of important points here

1. If you notice, the ShellViewModel is derived from Conductor<object>, which is responsible for orchestrating the navigation.

2. To create and place an item on a panel, all you have to do is ActivateItem(viewmodel).

3. When ActivateItem is called, the screen instance is created and placed on ‘ActiveItem’ in the ShellView.

4. There is a whole a lot you can do during the navigation process and I barely touched the surface. We will look at more features in the navigation in later posts.

Creating Silverlight Navigation using Jounce

Jounce has very good documentation on how to create Navigation and Region Management in the Codeplex. I always starts there. What I am doing to here to illustrate how to create Silverlight Navigation step by step. So before we go any further what are we trying to achieve? Here are the basic requirements;

I. Create two buttons on top of the screen as ‘Hello World’ and ‘Hello World1’ and bottom section will have a panel which display a page based on the button selection.

II. Create two separate pages which will display ‘Hello World’ and ‘Hello World1’. See the subtle difference in the text ‘World1’.

III. When user click the first button ‘Hello World’, the bottom section shows the ‘Hello World’ page and on ‘Hello World1’ click it shows ‘Hello World1’. At any point of time, we should see only one page.

Ok now we have the requirements done, lets step through the process of creating the application.


I. Create UI Part.

First lets create a simple Jounce application. I would strongly recommend you to go to Jounce page @ Codeplex and download the Jounce template for Visual Studio 2010. I always use it and it eliminates lot of code deletion and adding reference extra. So We start out by creating a Jounce Application

image


Once the project created, I would recommend you build and run it. I always do that just to eliminate any missing references.  If all are good you are suppose to get the following screen with ‘Welcome to Jounce’ message. If you do not see it then, you have a problem with Jounce references. One reason you might not able to get it up and running if you do not have System.Interactivity.dll not in your GAC.

image 

Lets assume that, you got it working. Next we are going to implement the first requirement that to add two buttons and a panel. We modify the MainPage.XAML to achieve this.

1. First add two buttons for Hello World and Hello World 1

        <Button Content="Hello World" Command="{Binding HelloWorld}" Grid.Row="0" Grid.Column="1"/>
        <Button Content="Hello World1" Command="{Binding HelloWorld1}" Grid.Row="0" Grid.Column="2"/>

2. Next we need to create the content panel to host the page on button click

<ContentControl Grid.Row="1" Grid.ColumnSpan="4" HorizontalAlignment="Stretch" VerticalAlignment="Stretch"
                HorizontalContentAlignment="Stretch" VerticalContentAlignment="Stretch">
            <ContentControl.Content>
                <StackPanel Orientation="Horizontal"/>
            </ContentControl.Content>
        </ContentControl>

This will create bottom panel to host the pages.

3. We are not done yet in the  main page.  Next we need to name the stack panel as a region to host the pages. This is achieved by adding Jounce Region namespace and then use the Region Name to name the panel.

<UserControl x:Class="NavigationTest.MainPage"
    xmlns="http://schemas.microsoft.com/winfx/2006/xaml/presentation"
    xmlns:x="http://schemas.microsoft.com/winfx/2006/xaml"
    xmlns:d="http://schemas.microsoft.com/expression/blend/2008"
    xmlns:mc="http://schemas.openxmlformats.org/markup-compatibility/2006"
    xmlns:sampleData="clr-namespace:NavigationTest.SampleData"
    xmlns:Regions="clr-namespace:Jounce.Regions;assembly=Jounce"
    mc:Ignorable="d"
    d:DesignHeight="300" d:DesignWidth="400">


If you notice the 3rd line from the bottom, we are referencing the region namespace which we will use to name the Content Control. We are going to modify the step (2) and add name to content control. So with the change it will look like this.

<ContentControl Grid.Row="1" Grid.ColumnSpan="4" HorizontalAlignment="Stretch" VerticalAlignment="Stretch"
                HorizontalContentAlignment="Stretch" VerticalContentAlignment="Stretch"
                Regions:ExportAsRegion.RegionName="AppRegion">
            <ContentControl.Content>
                <StackPanel Orientation="Horizontal"/>
            </ContentControl.Content>
        </ContentControl>

We named the content control as “AppRegion” that is the 3rd line from the top. That’s it. Now we completed the requirement (1). We created two buttons and a panel with a region name.


II. Create Two Pages.

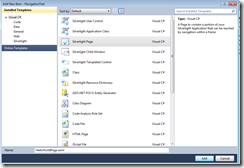
Now lets look at the requirement (2), that is to create two separate pages with just a textblock which displays two different strings. In the solution, now add new Silverlight Page like the following

image

This will create a new page and we add a text block to display “Hello World” like the following

<Grid x:Name="LayoutRoot">
        <TextBlock Text="Hello World"/>
</Grid>

Repeat the same and create HelloWorld1Page.

III. Implement Navigation.

Ok now we have the main page and two addition pages as we wanted, now we need to tie all of them together. So lets start from main page view model. We need to implement the command to execute on button click happens.  Before we start, delete the interface definition for the welcome text since we no longer use that. Now the modified code of View Model look like the following

namespace NavigationTest.ViewModel
{
    using Jounce.Core.Command;
    using Jounce.Framework.Command;
    using Jounce.Core.View;

    [ExportAsViewModel("MainViewModel")]
    public class MainViewModel : BaseViewModel, IMainViewModel
    {
        public IActionCommand<string> HelloWorld { get; private set; }
        public IActionCommand<string> HelloWorld1 { get; private set; }

        public MainViewModel()
        {
            HelloWorld = new ActionCommand<string>(ShowHelloWorld);
            HelloWorld1 = new ActionCommand<string>(ShowHelloWorld1);
        }

        public void ShowHelloWorld(string parameter)
        {
            EventAggregator.Publish(new ViewNavigationArgs("HelloWorld"));
        }
        public void ShowHelloWorld1(string parameter)
        {
            EventAggregator.Publish(new ViewNavigationArgs("HelloWorld1"));
        }
    }
}

We defined two button implementation one for each button. If you see the implementation, all we are doing is that, we are publishing an event with ViewNavigationArgs with the name of the pages in other words, the name you use in ‘ExportAsView’ for each new page you created. If you remember we did not jouncify the two pages we created so it does not have ‘ExportAsView’. So lets do that. Open the code behind for HelloWorld.cs and make the code look like the following

namespace NavigationTest
{
    [ExportAsView("HelloWorld")]
    [ExportViewToRegion("HelloWorld", "AppRegion")]
    public partial class HelloWorldPage : Page
    {
        public HelloWorldPage()
        {
            InitializeComponent();
        }

        // Executes when the user navigates to this page.
        protected override void OnNavigatedTo(NavigationEventArgs e)
        {
        }

    }
}

The third line is the standard Jounce attribute to name the page. The interesting part in this page is the fourth line. What we are saying here is that, when you get control, make sure, you identify the ‘AppRegion’ control and pace the view in there. Will do the same for HellowWorld1 code behind.


namespace NavigationTest
{
    [ExportAsView("HelloWorld1")]
    [ExportViewToRegion("HelloWorld1", "AppRegion")]
    public partial class HelloWorld1Page : Page
    {
        public HelloWorld1Page()
        {
            InitializeComponent();
        }

        // Executes when the user navigates to this page.
        protected override void OnNavigatedTo(NavigationEventArgs e)
        {
        }

    }
}

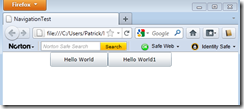
That’s it, now with these changes you would see a screen something like the following

image

Clicking Hello World button will show

image

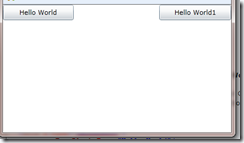
now clicking Hello World 1 will replace hello world page with Hello World 1 as shown below

image


That’s about it. Now if you want to show both the controls then instead of using Content Control in the main page, use ItemsControl. So the bottom line is, have a region defined in the main page to host the pages. When you want to host a page, just publish the ‘ViewNavigationArgs’ with the page name. In the page, decorate the page with which region that page has to display by ‘ExportViewToRegion’. As simple as that. Hopefully it helps out. I will attempt the same in Caliburn next.