Building your movie website with Movies DB in angularJS

I am a big fan of movies, for some time, I have been tinkering with building a website to see what is new on movies and TV. Recently I came across Movies DB website. The website by itself is wealth of information but the best part is, if you would sign up with them then you can use their rest services. You need to read the legal documents to see if it fits your bill also they throttle the requests coming in as well. I set out to write my own service so that I can use this service in my couple of other projects I am working on. Well, even that is already solved for me. Head out to lub-tmdb at GitHub, they have done most of the work for you already. So it is just a matter of hooking it into your project.

They have an excellent example project in their on how to use it. The example project is self contained, so I thought I add couple of lines to show, how to add into your existing project.

1. Download the min file from their build directory and put it in directory of your choosing. In my test code example, I put it in the root directory.

2. Add the script file to your index file, the real important thing is, it has to be added after your script with ‘angular.module’ definition. You would want to do the same if you build your own service.

<script src=”https://ajax.googleapis.com/ajax/libs/angularjs/1.2.18/angular.min.js”></script>
<script src=”app.js”></script>
<script src=”lub-tmdb.0.1.1.js”></script>

As you can see ‘lub-tmdb.0.1.1.js came adter my main app.js file.

3. I followed their example and created a simple search for a movie like the following in the index.html

<form ng-submit=”exec(‘search’, ‘movie’, query)”>
     <input type=”text” ng-model=”query”>
     <button type=”submit”>Search Movie</button>
</form>

<div>{{searchResults}}</div>

4. In the controller, again based on their example, I called the service as follows;

var app = angular.module(“main”, [‘lub-tmdb-api’])
     .value(‘lubTmdbApiKey’, ”);

var mainCtrl = function ($scope, lubTmdbApi) {

    var suc = function(result){
         $scope.searchResults = result.data;
     };

    var err = function (results) {
         $scope.searchResults = results;
     }

    $scope.exec = function (type, method, query) {
         lubTmdbApi[type][method]({
             query: query
         }).then(suc, err);
     }
};

app.controllers(“mainCtrl”, mainCtrl);

The important points in here are

  • Second line the above script, should have your api key that you got from the website.
  • Don’t convert it to JSON object in this line; $scope.searchResults = result.data;

I personally really enjoyed using both the angular service @ lub-tmdb and also the Movies DB. Both are solid and made my life little easier. Thanks a lot for both the services.

Testing in Angular World


This has been a hot topic for me lately. I covered testing AngularJS in couple of blogs but over the time I noticed people who are coming from .Net world who are not used to TDD model still fall back to the old style development that is without tests or tests have been added after the fact. I think, either of the approach is totally wrong. Testing is first class citizens in AngularJS and we should treat them that way. I want to go over couple of argument I got when I asked them about why there are no tests or not following TDD and lets discuss about it. I will try to answer the best of ability.

We are still learning AngularJS so I can’t write unit tests.

Ok it seems very valid point. I would strongly recommend understand and learn how to do tests first. Testing in Angular is simple and straight forward. I am going to focus on testing in the coming blogs. Angular support both unit testing and end to end testing (e2e) testing. It is easy to learn and get going fast. First understand AngularJS concepts like $scope, $http and others then learn how to mock them, the rest is nothing but writing simple tests. The bottom line, if you are trying to learn AngularJS, learn testing along with basic concepts and then go into the details of AngularJS features.

Now going back point made, if you want to do something and you do not know how to do it in AngularJS then you can not write test for it. Well that is not 100% true. If you are following TDD model, then once you get the requirement that you are trying write code for, you are suppose to write the test first. Now that you already know how to write test, go ahead and write the test first and then try to do the implementation. When you are trying to implement, you may run into problems, then modify the tests as you make progress to fit the model you are writing. This is true in end to end testing as well (e2e), you might have end to end test against a form and as you learn you realize that you need data table, change the e2e test for it. But write the test first. It will help. Again, with the tests, even when you are learning, it catch the unexpected errors that you might make when experimenting with new concepts.

We can’t write tests because there is no logic in the code.

Excellent point, AngularJS is used to develop client side code. So if you are developing application properly, client side should be as dumb as possible. So in theory, we will have MVC pattern applied to both client side and server side. So all the complex business logic will be in the server side controller. Since you do not have complicated logic at client side, client side code should be very simple. Normally when we start out the client side code will be very simple, we might make a webapi call to get some data, bind them to the variables and that is it. So for that we do not need any tests. Trust me when I say this, that is how all the projects start. Always they are very simple in the beginning and as project start to grow, you will have more complex logic in it and at that time, it will be difficult to add test to it.

In the above scenario, my suggestion is to add unit tests to all the functions you might add to client side code, even if it is single line assignment statement. You will also agree, it is easy to write test cases of single line assignment statement, so go ahead and add the tests for it. It might seem silly, but now when you run the test, you have code coverage for the functions you have written. The benefit comes in the next iteration you are asked to add some logic to that method with simple assignment. You already have tests so you know why that function exists to start with and with that understanding you can add more tests to support new functionality without breaking the old ones. In this case, you are trying to understand what that function suppose to do since you might not have written the code, so you do not know what it was suppose to do. With tests, it is easy to see the scenarios and understand what exactly those methods suppose to do. It gives the confidence in your change you are making.

AngularJS provides not only unit testing, it also gives e2e testing. So even if there are no logic in the client side, you are working with the data coming from server to display data. So you can write tests for it. Write your e2e test with mock data and verify if the UI elements display the data as it suppose to be. The cases where the developer thinks there is no logic in the client side, then you will have more e2e tests than unit tests.

Angular JS – 10 (End to End Testing – Karma)

In the previous blog we looked at what is need to build a end to end test and run those test manually. In this blog, we will see how we can run this automatically in the background. The good thing is, there is nothing special end to end testing rather how you run it. Hopefully you got something from my previous blog on how to write an end to end test.

If you haven’t gotten the Intro to Karma project from GitHub, please do get it. It has the sample code and everything needed to run automated end to end test. Couple of things you need to run end to end test using Karma. You need a web server so in our case we will be using ‘node’. If you do not have it, please install it. Once you have node, you need to install Karma. Now that we have the sample code and required components like node and Karma, lets see how we can run Karma to test end to end tests.

To run karma, one would need a configuration file. Now if you got the introduction to karma project  from the GitHub then it comes with a simple configuration file. We will use that to run the end to end test. So lets first run the test with the configuration file already in the project. It is a two step process to do automated end to end tests.

  • Start the node server. Navigate to the location of the project. From the root directory, in DOS/terminal

node test\scripts\web-server.js

  • Now that node is running, lets run the Karma in another DOS/terminal from the root location of the project

karma start config\karma-e2e.conf.js

After the two steps, the test should run only once, it will not wait for code change and keep running the tests. We will modify that little later.

image

If you notice, we run Karma pointing to Karma.e2e.conf.js. Lets look at the configuration file.

1 basePath = '../'; 2 3 files = [ 4 ANGULAR_SCENARIO, 5 ANGULAR_SCENARIO_ADAPTER, 6 'test/e2e/**/*.js' 7 ]; 8 9 autoWatch = false; 10 11 browsers = ['Chrome']; 12 13 singleRun = true; 14 15 proxies = { 16 '/': 'http://localhost:8000/' 17 }; 18 19 junitReporter = { 20 outputFile: 'test_out/e2e.xml', 21 suite: 'e2e' 22 }; 23

The complete documentation of the configuration file can be found in the Karma documentation. Lets look at this simple configuration file.

Line 1: This is to set the base path for all the file references. I always like to make the base path to the root of the project. In this case, the karma configuration file is sitting @ config folder under the root folder so we will change one directory to the root directory.

Line 3-7: specifies what are the files to use for running the tests, Line 3-5 are default values. Line 6 specifies where is the end to end test.

Line 9: This option specifies, if you want to continue watch the files for any changes. In our case it is ‘false’, which means, it will run only once and it will not continue watching for any changes.

Line 11: Which browsers will be used for end to end tests.

Line 13:  This one is critical. This option specifies, do you want to run the test only once or run once and run and wait for changes the run automatically. So to run the end to end test automatically in the background as you are developing is by setting this ‘false’ and also Line 9 and set the value to ‘true’.

Angular JS – 9 (End to End Testing – manual)

Continuing from the previous blog, lets look at end to end testing. Based on what you have seen so far, it is very obvious without telling, how easy it to test Angular JS. The true separation of view and controller lend itself to test controller very easily. Everything is injectable which makes everything mockable in Angular JS. Now that we know, we can test controller with ease with Jasmine and Karma. Lets look at the other cool testing we can do in Angular, which is End To End test.

Angular End to End test allows the developer to do UI testing. This allows developer to enter values directly in the DOM elements and perform operations and then validate the results. This have been a difficult task so far with other client technologies and Angular JS made it easy for us. These end to end tests are called scenario tests. Angular follows Jasmine model of writing tests for end to end test as well.

If you have not already downloaded the Intro to Karma from Github, please download and we will use the same code to go over the end to end test.

There are two ways one could run end to end test. The first approach is to create your test and run the test manually and verify if the tests are passing. The second approach is to have the test run automatically in the background all the time while you developing your application and writing the tests. With this approach there is no need to run the test every time one would make a change to the code or tests. We will review the first approach in this blog.

Manual Test:

First lets look at the test we are going to write. Our application is very simple, it takes two numbers, multiplies and show the result on the screen as shown below

image

Since we are doing the UI testing, lets see the view under test.

1 <table> 2 <tr><td>First Number</td><td><input type="text" ng-model='firstNumber'/></td></tr> 3 <tr><td>Second Number</td><td><input type="text" ng-model='secondNumber'/></td> 4 <td><button ng-click='Multiply(firstNumber, secondNumber)'>Multiply</button></td> 5 ><td><input type="text" ng-model='decimals'/></td></tr> 6 <tr><td>Result</td><td>{{result | number: decimals}}</td></tr> 7 </table>

The two input fields are bound to ‘firstNumber’ and ‘secondNumber’, so in our test, we need to enter values for those two fields. Then find the button and click the button. Which would then perform the multiplication and save the result to ‘result’. So to confirm our UI code worked properly, we need to verify if ‘result’ contains the expected result. With this knowledge lets look at the test. The end to end test is available under test\e2e\mainscenario.js

As I mentioned before, end to end test also borrowed testing pattern from jasmine where we describe what we are testing and before each test and after each test, one could perform some task. All tests where marked by ‘it’. So going back to the test we were going to do;

1 it('should multiply two numbers', function(){ 2 input('firstNumber').enter(2); 3 input('secondNumber').enter(2); 4 element(':button').click(); 5 expect(binding('result')).toEqual('4.00'); 6 });

Line 1: starts the test with ‘it’, followed by two parameters, first one is the description of the test, followed by the test itself.

Line 2: Find the input for ‘firstNumber’ and enter value ‘2’.

Line 3: Find the input for ‘secondNumber’ and enter value ‘2’.

Line 4: Find the only button and click the button to perform multiplication.

Line 5: Find the ‘result’ and verify the result is ‘4.00’. Even though when we multiply 2 * 2 is 4, by default the decimal digit is set to 2 and result ‘4’ is send to number filter so the result becomes ‘4.00’.

When we do end to end test, we are testing the html page, so before each test, we need to make sure, the browser is pointing to the page under test. To do that, one need to define the beforeEach or at the start of each test. In our case, we define a beforeEach to route to the index.html as shown below

1 beforeEach(function(){ 2 browser().navigateTo('../../app/index.html'); 3 });

Line 2: has ‘../../app/index.html’. This is very important. To run, end to end test, one need to run the a web server first. Since I will be using node and the web server script is at test/script, it is very important you run the web server first from this location as follows

node test\scripts\web-server.js

now if you follow the line (2), what we are doing is, trying to find index.html from app folder two directories up from web-server.js location. That’s why we have the navigation. If web-server.js placed in root directory, then our navigateto would be ‘app/index.html’.

With node server is running, we need to create a html file to run our end to end script. It will be very simple script, we need to point to angular-scenario.js script and also our end to end script that’s all about it. So here is our runner.html file

1 <!doctype html> 2 <!-- to run e2e make sure you are running your web server --> 3 <!-- in our example we run node test/scripts/web-server .js --> 4 <!-- also open browser and point to http://localhost:8000/test/runner.html --> 5 <!-- we need to make sure we run node same way when we run the e2e test in command line as well --> 6 <html lang="en"> 7 <head> 8 <title>End2end Test Runner</title> 9 <script src="lib/angular-scenario.js" ng-autotest></script> 10 <script src="e2e/mainscenario.js"></script> 11 </head> 12 <body> 13 </body> 14 </html>

Please read step 2-5 in the html file to make sure everything is setup.

Now launch Chrome and point to the url in line 4 and that is it. You will have your end to end test run.

image

If you get the above screen then you are all set. In case if you run into problem, then you might not have one or more of the following not setup properly as mentioned in ng-model website. Also please try with Chrome do not try with IE.

Silverlight to Angular – 7 (Directives – I)

Even though I have Silverlight in the blog heading, we part ways with Silverlight in the last blog. Now, we are in Angular world. Ask any of the Angular user, which is their favorite feature in Angular? 99% of them will say, ‘Directives’. Without doubt, it is one of my favorite feature as well. In the beginning, when we started out with Angular, I mentioned that Angular can teach static HTML some new tricks like new elements, attributes etc., and it is done with Directives. It is without doubt that sets Angular apart from all the frameworks or toolsets.

I was going to create a step by step instruction for Hello Word directive but John Lindquist beat me to it. So instead of me doing ‘Hello World’, we will look at creating a directive for addition example we have been doing in couple of our examples. I am planning on doing it in three parts.

  1. Create a simple directive which shows static content.
  2. Create a simple directive which accepts input from HTML.
  3. Create a directive with binding and control hook up.

Lets start out by looking at our existing example;

View:

1 <!DOCTYPE html> 2 <html ng-app> 3 <head> 4 <title></title> 5 </head> 6 <body> 7 <div ng-controller="additionCtrl"> 8 First Number: <input ng-model="NumberOne"/><br/> 9 Second Number: <input ng-model="NumberTwo"/> 10 <button ng-click="add(NumberOne, NumberTwo)">Add</button><br/> 11 Result: {{Result}} 12 </div> 13 <script src="https://ajax.googleapis.com/ajax/libs/angularjs/1.0.1/angular.min.js"></script> 14 <script src="Scripts/additionCtrl.js"></script> 15 </body> 16 </html>

Controller:

1 function additionCtrl($scope) { 2 $scope.NumberOne = 0; 3 $scope.NumberTwo = 0; 4 $scope.Result = 0; 5 $scope.add = function (a, b) { 6 $scope.Result = Number(a) + Number(b); 7 }; 8 }

In the current code, there are no directives, it nothing but our simple addition program. We are going to first modify our code to create a directive, similar to ‘Hello Word’ . This will be new directive which will create a new HTML element, which will display ‘First Number’. Similar to Filters, we will create directive at module level. Lets start by creating a simple directive;

Problem: Create a new HTML element, which will display ‘First Number’. Call the new element as ‘display-number’.

Lets start with the test so we know what are we trying to do and also learn the TDD along the way. I am still not very good at Javascript so I might be not be following some standard pattern, which I hope someone will help me correct.

Test:

Following our previous unit test model, we will create two folders, one for App and another one for Test so that we can separate the code that goes into production. We will copy the SpecRunner.html from our previous test project and which is similar to the following

1 <!DOCTYPE HTML PUBLIC "-//W3C//DTD HTML 4.01 Transitional//EN" 2 "http://www.w3.org/TR/html4/loose.dtd"> 3 <html> 4 <head> 5 <title>Jasmine Spec Runner</title> 6 7 <link rel="shortcut icon" type="image/png" href="http://searls.github.com/jasmine-all/jasmine_favicon.png"> 8 <link rel="stylesheet" type="text/css" href="C:\temp\jasmine\lib\jasmine-1.3.1\jasmine.css"> 9 <script type="text/javascript" src="http://searls.github.com/jasmine-all/jasmine-all-min.js"></script> 10 <script type="text/javascript" src="https://github.com/akiellor/rhino-hax/blob/master/modules/jasmine-console-runner.coffee"></script> 11 12 <script type="text/javascript" src="http://code.angularjs.org/1.0.6/angular.js"></script> 13 <script type="text/javascript" src="http://code.angularjs.org/1.0.6/angular-mocks.js"></script> 14 15 <!-- include source files here... --> 16 <script type="text/javascript" src="../App/scripts/additionCtrl.js"></script> 17 18 <!-- include spec files here... --> 19 <script type="text/javascript" src="spec/displayNumber.spec.js"></script> 20 </head> 21 22 <body> 23 </body> 24 </html>

Line (8) – Jasmine downloaded location will have the css file.

Line (16) – points to our controller where we will do addition of  two numbers.

Line (19) – This is where we are going to put our test spec.

Following code is our displayNumber.spec.js

1 describe('displayNumber', function () { 2 var element, scope; 3 4 beforeEach(module("additionApp")); 5 6 beforeEach(inject(function($rootScope, $compile) { 7 element = angular.element('<display-number></display-number>'); 8 scope = $rootScope; 9 $compile(element)(scope); 10 scope.$digest(); 11 })); 12 13 it('should create displayNumber span element', function () { 14 var elem = element.find("span"); 15 expect(elem.length).toEqual(1); 16 }); 17 18 it('should create displayNumber span element with "First Number" as text', function () { 19 debugger; 20 var elem = element.find("span"); 21 expect(elem[0].childNodes[0].data).toEqual("First Number"); 22 }); 23 });

Line (4) – When testing directives, we will create an app and we load that every time before each test.

Line (6-11) are the ones required to generate the directive into HTML span element.

Line (6) – Will talk about compiling and linking little bit later, but for now, we inject rootScope and compile from angular mock to our test.

Line (7) – <display-number> is our directive under test. So we create an element with that directive as if it appears in the view.

Line (9) – Compile will walk through the HTML and create list of angular directives available.

Line (10) – $digest triggers the process converts the all the directives to proper HTML tag and generate associated watch etc.,

Line (13 – 16) is our first test to make sure there is span tag created after directive processed.

Line (18 – 22) is our second test, which make sure the text ‘First Number’ shows up in the Span.

If you would run, the specRunner.html, both the tests will fail.

View with the directive.

You can find the solution in jsFiddle.

1 <div ng-controller="additionCtrl"> 2 <display-number></display-number>: <input ng-model="NumberOne"/><br/> 3 Second Number: <input ng-model="NumberTwo"/> 4 <button ng-click="add(NumberOne, NumberTwo)">Add</button><br/> 5 Result: {{Result}} 6 </div>

Line (2), you will see a new HTML tag <display-number>, this is the part which makes Angular awesome. We literally created a new HTML tag for the purpose of our coding. Even though other frameworks allow you to do something similar, you can not create new HTML element like Angular does. Couple of things to remember;

  1. Make sure ng-app is there in the HTML tag pointing to app module.
  2. Always make sure, when you create an directive element, always put closing element. Don’t use inline closing like <display-number />

Here is the controller with directive

1 var app = angular.module("additionApp", []); 2 3 app.directive("displayNumber", function () { 4 return { 5 restrict: 'E', 6 template: '<span>First Number</span>' 7 }; 8 }); 9 10 function additionCtrl($scope) { 11 $scope.NumberOne = 0; 12 $scope.NumberTwo = 0; 13 $scope.Result = 0; 14 $scope.add = function (a, b) { 15 $scope.Result = Number(a) + Number(b); 16 }; 17 }

Line (1) when using directives, similar to Filters, you need to have an app associated with it.

Line (3) sets up the directive. If you notice the method name is ‘displayNumber’ (camel case). But when you use the directive you use display-number.

Line (4) there are couple of ways, you can create directives and we are following a simple approach where it return a class for directives.

Line (5) ‘restrict’ specifies, is the directive an ‘Element’ (E), Attribute inside an element (A), Class (C) or Command (M). In our case we are creating a new element called display-number so we are restricting it to an Element. The default is Attribute.

Line (6) provides the template that need to be used in place of the directive. In this case, it is nothing but straight forward span element.

Rest of the code is our old controller. Next we will look at how to pass in values to

Silverlight to Angular – 6 (Unit Testing)

Unit testing is one of the important and most often overlooked process in development. When we started development in Silverlight, we were so excited that with clear model, view and viewmodel separation, we were all set to create a fully tested code. Before you knew it, we created production code with Silverlight and shipped with 0% unit test. So the bottom line is, even if there are ways to create unit test, it is up to us to create unit tests. Well, creating unit tests is one thing and creating proper unit test is different thing. I remember creating unit tests, with reading data from database, calling bunch of methods to massage data before actually calling the method to test. I learned it hard way that, it was not right unit test. So there are two aspects of unit tests we need to remember, one is to write unit test and another is to write proper unit test. In this blog, lets look at the unit testing in Angular. Here is where I am going to break off from Silverlight and start to focus on Angular. One side note, because of the nature of Javascript when developing big application, do yourself a favor make sure, it have 100% coverage.

AngularJS has a decent but incomplete document on unit testing. Hopefully they will come around and finish it. We will look at straight forward unit testing with simple controller. If you have noticed so far, our controller is nothing but pure Javascript. It does not have any references to anything else like DOM manipulation or XFR calls. So our testing so far will be nothing but simple Javascript testing. It turned out there are ton of unit testing frameworks available for Javascript. As a Javascript beginner myself, I was looking for some testing framework which looked familiar and finally I settled on Jasmine. I made this decision purely on my previous RSpec experience. Once I get a handle on that, I will explore the other options available. If you would follow this link, it has fantastic one page reference to all the features available in Jasmine. It should not take more than an hour to go through and try them all out.

Lets see how can we create unit test for one of our sample code.

Problem: Given two numbers(integer or float, positive or negative), add them.

Approach: As a developer, I am still learning to approach this problem with TDD in mind. So to do TDD, you first write out the test cases your function need to handle before writing the actual code. So what are the possible test cases?

  1. It should add two valid integer numbers.
  2. It should add one integer and one float.
  3. it should add two float numbers.
  4. It should add when the numbers are zeros.
  5. It should add when one number is zero.
  6. It should add two negative numbers.
  7. It should add when one number is negative number.
  8. If first parameter is non numeric number, do not add.
  9. If second parameter is non numeric, do not add.
  10. If both the input are non numeric, do not add.

The proper TDD is only to write unit test based on the requirements. If you look at the (8-10), it was not mentioned in the requirement then why would we need to handle that situation? So don’t write those test cases.

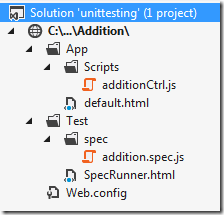
So based on our requirement, I came up with 7 (skipped 3) test cases. Following TDD, write test first, make it fail and then write the code to pass. I came across two different approaches as well. One was to write the first test, make it fail and then write the code to make it pass and then go to your next test. The second approach was to write all the tests first and write the code to make them pass. I like earlier approach than later one. As I said before, I am going to use Jasmine and you can follow the install instructions in Jasmine to get Jasmine going and then follow along here; Here is the directory structure of my application
image

Under main web site, I have two folders, one for the app code and another folder for the testing. This way, we will not mix the production code with testing code and will not distribute the test code to production either. The test folder has spec folder, this is where all the unit tests housed. In the root of the test folder we have SpecRunner.html (we will see that in a minute), which when we run, will run all all the tests specified in the specrunner.

Iteration 1:

Unit Test:

First we are going to write our test code and we call it addition.spec.js; and the code looks like the following to accommodate our first test;

1 describe("Addition", function () { 2 3 var $scope, ctrl; 4 5 beforeEach(inject(function ($rootScope, $controller) { 6 $scope = $rootScope.$new(); 7 ctrl = $controller('additionCtrl', { 8 $scope: $scope 9 }); 10 })); 11 12 it("should add two integer numbers.", function () { 13 $scope.add(2, 3); 14 expect($scope.Result).toEqual(5); 15 }); 16 }); 17

Just to test 2 line of code we ended up writing close to 16 lines of code. This is because, we want to bring angular context and scope in to the testing as if it is running through angular. It is done with angular-mock.js, this will get added to specrunner.html in the next step. For now, lets look at the line (5-10). It is important to understand, how does the test run. When Jasmine runs, it will first look for any ‘beforeEach’ (line 5) and if found, in our case, there is one and it get executed before every test.  A test is nothing but the one starts with ‘it’, like at line (12).

Right now in our application, we are using default application and module and we are only creating a controller. As you know, in our controller code, we pass $scope from angular context to the controller. So to test our code, we need create mock context and that is what the controller have to use. To achieve this, before each test code, we will call inject method and for the giving rootScope, we create a mock Angular scope and that is passed to the controller in test as the scope. For now, you can use this as a template for writing our test and accessing the scope variable inside the test.

Lets look at the test itself, removing all the angular part out of it, which you will repeat in all your test suit once anyway. Without angular part in it, the test by itself will look like the following;

1 describe("Addition", function () { 2 it("should add two integer numbers.", function () { 3 $scope.add(2, 3); 4 expect($scope.Result).toEqual(5); 5 }); 6 });

So here is the rundown of this test;

  1. All the test starts with a test suite with ‘describe’ (line 1). Each test suite is given a suit name (Addition, in our case).
  2. If each test needs some common things to happen, like initializing, then call ‘beforeEach’ (line 5 in the previous complete test code).
  3. Every test, starts with ‘it’. ‘it’ has two parts (line 2), one is the name of the test and second one the test itself.
  4. In every test, after some action, validate the test result by ‘expect’ (line 4). ‘expect’ also has three parts, source, target and comparison operator. In our example, source is $scope.Result, target is ‘5’ and comparison operator is ‘toEqual’.

I would strongly recommend anyone interested in testing with Jasmine to read through their fantastic documentation with example.

Jasmine Spec Runner:

Now that the first test unit test code completed, lets add the information required to run the unit test in Jasmine. We run Specrunner.html to the tests we want to run.

1 <!DOCTYPE HTML PUBLIC "-//W3C//DTD HTML 4.01 Transitional//EN" 2 "http://www.w3.org/TR/html4/loose.dtd"> 3 <html> 4 <head> 5 <title>Jasmine Spec Runner</title> 6 7 <link rel="shortcut icon" type="image/png" href="http://searls.github.com/jasmine-all/jasmine_favicon.png"> 8 <link rel="stylesheet" type="text/css" href="http://searls.github.com/jasmine-all//jasmine.css"> 9 <script type="text/javascript" src="http://searls.github.com/jasmine-all/jasmine-all-min.js"></script> 10 11 <script type="text/javascript" src="http://code.angularjs.org/1.0.6/angular.js"></script> 12 <script type="text/javascript" src="http://code.angularjs.org/1.0.6/angular-mocks.js"></script> 13 14 <!-- include source files here... --> 15 <script type="text/javascript" src="../App/Scripts/additionCtrl.js"></script> 16 17 <!-- include spec files here... --> 18 <script type="text/javascript" src="spec/addition.spec.js"></script> 19 </head> 20 21 <body> 22 </body> 23 </html> 24

Line (6 – 12) are all the required javascripts. Based on your application, you will add more library scripts here.

Line (15) specified which is the controller under test. This is pointing to the production code under ‘App’ folder.

Line (18) specifies, which are all the unit tests to run. In our case we have only one unit test spec to run.

App Setup:

You can run the test as it is now and it will fail with error like unable to find additionalCtrl etc., that is our red to green approach anyway.

Now that all the hooks are in place, open the windows explorer, find Specrunner.html and double click it. It will open a browser and run the test. This test will fail since we did not add any controller or view. So lets add them.

view:

1 <!DOCTYPE html> 2 <html ng-app> 3 <head> 4 <title></title> 5 </head> 6 <body> 7 <div ng-controller="additionCtrl"> 8 First Number: <input ng-model="NumberOne"/><br/> 9 Second Number: <input ng-model="NumberTwo"/> 10 <button ng-click="add(NumberOne, NumberTwo)">Add</button><br/> 11 Result: {{Result}} 12 </div> 13 <script src="https://ajax.googleapis.com/ajax/libs/angularjs/1.0.1/angular.min.js"></script> 14 <script src="Scripts/additionCtrl.js"></script> 15 </body> 16 </html>

This is nothing more than vie, which we have seen before.

Controller:

Since we are following TDD, lets try make sure we stick to the minimum code to make the test pass.

1 function additionCtrl($scope) { 2 $scope.NumberOne = 0; 3 $scope.NumberTwo = 0; 4 $scope.Result = 0; 5 $scope.add = function (a, b) { 6 $scope.Result = parseInt(a) + parseInt(b); 7 }; 8 }

This code takes two objects and convert it to int and then add them. As you would expect nothing special and still javascript function. Now if you would run the test should run successfully.

Now that our first test is successful, lets write the second test.

Iteration 2:

It should add one integer and one float. Add the following code to the addition.spec.js

1 it("should add one integer and one float numbers.", function () { 2 $scope.add(2, 3.5); 3 expect($scope.Result).toEqual(5.5); 4 });

When this test is run, we would expect it to pass but it will fail since we are doing parseInt, which is converting the number to int thus losing the fraction part. So now the test is RED, go back to and fix the code to make it run. Instead of using parseInt, use Number function, which will retain the fraction.

Here is the modified controller

1 function additionCtrl($scope) { 2 $scope.NumberOne = 0; 3 $scope.NumberTwo = 0; 4 $scope.Result = 0; 5 $scope.add = function (a, b) { 6 $scope.Result = Number(a) + Number(b); 7 }; 8 }

Now if you run specrunner.html the test pass. You keep adding test and make sure all test pass.

While learning unit testing with Angular, I ran into bunch of problems, thanks to @karlgold for helping me sort things out.

Silverlight to Angular – 5 (IValueConverter – filter)

IValueConverter is without doubt one of the most used feature (at least in our side of the world) in Silverlight. We have lot of data, which, if we show them as it is to the user, it is completely useless. To make it more meaningful, we use Value Converter to convert and display it to the user. IValueConvert provides a way to add logic to the binding data without changing the data. IValueConverter has two methods, ‘Convert’ to convert the original data that is bound but translate with some logic to give different result that then get rendered in the UI. ‘ConvertBack’ is to take user input and apply some logic to revert it to some other form to store it at the back end. Most of the time, whenever we use IValueConverter, we always end up using the ‘Convert’ and seldom use ‘ConvertBack’, now I am going to use that as an excuse since Angular provides only one way convert, it does not have provision to convert it back. Even though I say, we don’t use ‘convertback’ but it is very useful feature and is used a lot, one good example is ‘Color Picker’. We will try to explore convert back at a later time. For now, we will see what is available in Angular out of the box that we can use.

Problem: Multiply two numbers and display the result with two decimal points.

Silverlight:

Only difference between our previous solution to this is that we have value converter and it is used in the binding to change the incoming data to more meaningful data. Lets look at the view

View:

1 <Grid.Resources> 2 <converter:TwoDigitConverter x:Key="Converter" /> 3 </Grid.Resources> 4 <TextBlock>Number 1</TextBlock> 5 <TextBox Text="{Binding NumberOne, Mode=TwoWay}" Grid.Column="1"></TextBox> 6 <TextBlock Grid.Row="1">Number 2</TextBlock> 7 <TextBox Text="{Binding NumberTwo, Mode=TwoWay}" Grid.Row="1" Grid.Column="1"></TextBox> 8 <Button Grid.Row="1" Grid.Column="2" Command="{Binding Multiply}" CommandParameter="">Multiply</Button> 9 <TextBlock Grid.Row="2" Grid.Column="1" Text="{Binding Total, Converter={StaticResource Converter}}"></TextBlock>

Line (2 – 4) provides us the hook into the value converter to be used in the XAML. Line (9) binds the result, even though the it binds to the result, we are asking the binding to use the associated converter to apply the conversion based on the convert logic and use the result to display in the ‘TextBlock’.

ValueConverter:

1 public class TwoDigitConverter:IValueConverter 2 { 3 4 public object Convert(object value, Type targetType, object parameter, System.Globalization.CultureInfo culture) 5 { 6 var result = value as float?; 7 result = result ?? 0; 8 return string.Format("{0:N2}", result); 9 } 10 11 public object ConvertBack(object value, Type targetType, object parameter, System.Globalization.CultureInfo culture) 12 { 13 throw new NotImplementedException(); 14 } 15 }

When we create Value Converter, it has to implement IValueConverter, which have only two methods that we need to implement. Convert and ConvertBack as we discussed in the beginning. Since Angular only supports one way conversion, we created this sample conveniently to show case only the ‘Convert’ part of ValueConverter.  Convert method does not do anything special, it takes the input number and returns the result with 2 decimal digits.

Our view model exposes the three variables and a command, nothing else.

Angular:

Angular provides filters, a way to format data for display. There are couple of ways we can use filters. You can use filters in line or create custom filters. If you were to create custom filters, you can reuse them in any controllers in a given module, it is like using resource file in Silverlight. One additional benefit of the creating custom filters, you can chain them to pass the input to multiple functions before creating final result. Lets first look at the inline approach to solve the problem and then we will write custom filter.

In-Line formatting:

View:

Since it is inline formatting, the formatting happens in the View code itself.

1 <!DOCTYPE html> 2 <html ng-app> 3 <head> 4 <title></title> 5 <script src="https://ajax.googleapis.com/ajax/libs/angularjs/1.0.1/angular.min.js"></script> 6 <script src="scripts/controller.js"></script> 7 </head> 8 <body> 9 <div ng-controller="controller"> 10 First Number: <input ng-model="NumberOne"/><br/> 11 Second Number: <input ng-model="NumberTwo"/><button ng-click="Multiply()">Multiply</button><br/> 12 Result : {{Result | number:2}} 13 </div> 14 </body> 15 </html>

Everything is standard here except line (12). In line 12, we get the result from the controller and angular will read the result and feed it to the expression in the pipe. In this case we are using number filter out of box to format number. There are few filters available out of box,  take a look at this AngularJS cheat sheet.

Custom formatting:

There are situations, where out of the box filters will not be sufficient and we will need some custom filters to format the data. Angular filters are very powerful on that regard. As I said previously,

  1. Since you can create filters as part of module, these filters are available across all the controllers in the module.
  2. Filters can be chained to create more customizable output data.
  3. Compare to Silverlight, we can pass in as many parameters as you want to the filters.
  4. If the filters are very simple and out of box, use the default filters.
  5. It written properly, you can call filters with only available arguments and rest can assume default values(like optional parameters in c#).

So in our case, even though we could use simple out of the box formatting, we will create a custom filter just for the sake of demonstration. So far in all our examples we left ng-app as empty string but when you want to use filters then you need to create a module and assign the filter to that module. With that in mind, here is the modified view.

1 <!DOCTYPE html> 2 <html ng-app='customFilters'> 3 <head> 4 <title></title> 5 </head> 6 <body> 7 <div ng-controller="controller"> 8 First Number: <input ng-model="NumberOne"/><br/> 9 Second Number: <input ng-model="NumberTwo"/><button ng-click="Multiply()">Multiply</button><br/> 10 Result : {{Result | twoDigits}} 11 </div> 12 <script src="https://ajax.googleapis.com/ajax/libs/angularjs/1.0.1/angular.min.js"></script> 13 <script src="scripts/controller.js"></script> 14 </body> 15 </html>

Line (2) now has the module name. We named it as ‘customFilters’. You will see in the view model, how we create a module and add the filters into the module.

**Note: It important that you put the module name in ng-app, if not none of the custom filters you write will work. Take it from me, I spend hours trying to figure out why my custom filter was not working, finally to find out, I missed the module name in the ng-app. **

Line (10) now feeds the result value to the custom filter ‘twoDigits’, which will do the magic of converting the result to a number with two decimal digits.

Controller:

1 angular.module('customFilters', []). 2 filter('twoDigits', function() { 3 return function(input) { 4 return input.toFixed(2); 5 }; 6 }); 7 8 function controller($scope) { 9 $scope.NumberOne = 0; 10 $scope.NumberTwo = 0; 11 $scope.Result = 0; 12 $scope.Multiply = function () { 13 $scope.Result = $scope.NumberOne * $scope.NumberTwo; 14 }; 15 }

So what is new compare to what we have seen so far?  Line (1-6) creates the module and adds the custom filter to the module.

Line (1) – creates the module named ‘customFilters’. During the angular context generation, angular get hold of ng-app for the first time, it will look for the definition of module in the controller to bootstraps the application. In the module definition, there are two parameters, first one is the name of the module and for sake of simplicity, lets ignore the second parameter ‘[]’ for now.

Line (2) – Please note that, there is a ‘.’ at the end of the line (1), with that we are directly adding a filter called ‘twoDigits’ to the filter factory.

Line (3) – Actual function which takes input and perform some task, in here format number to two decimal digits (line 4) and return the result.

Even though I presented ‘filters’ as way to format data, it is much more than that, it can do what ‘filter’ is supposed to do like filtering. We will look at that in one of the later post. Lets take this example one more level up to show how to pass parameters to the filter.

Problem: Two two number and multiple and set the result precession based on user input.

View:

The view is exactly same as the last one except now, we have one input field to enter number of decimal digits user wants to see in the result.

1 <div ng:app="customFilters"> 2 <div ng-controller="filterCntl"> 3 First Number: <input ng-model='NumberOne'></input><br> 4 Second Number: <input ng-model='NumberTwo'></input><button ng-click='Multiply()'>Multiply</button> 5 Decimals : <input ng-model='Decimals'></input><br> 6 Result: {{ Result | twoDigits: Decimals }} 7 </div> 8 </div>

The interesting part in the view is Line (6), this time, instead of feeding result to twoDigit filter, we are also passing the Decimals value as parameter to the filter.

Controller:

1 angular.module('customFilters', []). 2 filter('twoDigits', function() { 3 return function(input, decimals) { 4 return input.toFixed(decimals); 5 }; 6 }); 7 function filterCntl($scope) { 8 $scope.NumberOne = 0; 9 $scope.NumberTwo = 0; 10 $scope.Result = 0; 11 $scope.Decimals = 2; 12 $scope.Multiply = function () { 13 $scope.Result = $scope.NumberOne * $scope.NumberTwo; 14 }; 15 }

Line (3) of the controller now takes two parameters, first argument will always be the input and second one is number of digits. For sake of simplicity I am not checking isNaN etc., in the ‘twoDigits’ method. Here is the jsFiddle of the solution.

Suppose you may want to pass more than one argument to the filter function, then you will simple concatenate the arguments as

{{ input | filter: arg1 : arg2 : arg2}} 

I found filter to be very powerful and useful.

Silverlight to Angular – 4 (DataTemplates)

In Silverlight, when you are rendering some complicated data in a control, you will use DataTemplate to make it more readable to the user. One simple example would be, if you have a ListBox and you normally put a single property like state or year etc.,. But you will run into a situation, where you may want to display more than one property per row. One such example is displaying Diggs story to demonstrate the use of Listbox in Silverlight. For sake of simplicity, we will look a very simple example.

Problem: Display all students with their ID and Name in a listbox to select.

Silverlight:

By default, when you use ListBox in silverlight, you can bind it to a collection and point to a property of the object in the collection to display. If you want to display more than one properties from the object, then you need to use ItemTemplate. That is what we are going to do. For this example, we have a collection of Students, with following properties

1 public class Student 2 { 3 public string Id { get; set; } 4 public string Name { get; set; } 5 public string Grade { get; set; } 6 }

Since we need to work with collection to bind to control’s itemsource, we will create an observable collection of students like the following

1 public class Students:ObservableCollection<Student> 2 { 3 public Students() 4 { 5 Add(new Student() {Id = "1", Name = "First", Grade = "A"}); 6 Add(new Student() {Id = "2", Name = "Second", Grade = "B" }); 7 Add(new Student() { Id = "3", Name = "Third", Grade = "C" }); 8 9 } 10 }

View:

In our View, we will create a Listbox control and bind the Students collection to it. We are planning to display for now, just the Id and Name. Since the control’s DisplayMembersPath limitation, we will create a ItemTemplate to host the data template.

1 <ListBox ItemsSource="{Binding CurrentStudents}" Grid.Column="1" Margin="36,5,36,10"> 2 <ListBox.ItemTemplate> 3 <DataTemplate> 4 <Grid> 5 <Grid.ColumnDefinitions> 6 <ColumnDefinition Width="20*"></ColumnDefinition> 7 <ColumnDefinition Width="*"></ColumnDefinition> 8 </Grid.ColumnDefinitions> 9 <TextBlock Text="{Binding Id}" Grid.Column="0"></TextBlock> 10 <TextBlock Text="{Binding Name}" Grid.Column="1"></TextBlock> 11 </Grid> 12 </DataTemplate> 13 </ListBox.ItemTemplate> 14 </ListBox>

Nothing special here, We assigned the ObservableCollection of Students to the ListBox, and then we create a gird inside each row of ListBox and display Id and Name.

ViewModel:

This exposes a property for CurrentStudents, nothing else

1 public ObservableCollection<Student> CurrentStudents 2 { 3 get 4 { 5 return new Students(); 6 } 7 }

Most of the work we need to do is in the View to tell the Silverlight to create each row of ListBox with more than one property of the object collection.

AngularJS:

To my surprise, the amount of code we need to write to achieve the same is very less in Angular, there is not a lot of ceremony in here. The only and the main difference here between Silverlight and Angular is the building elements for the collection. In Silverlight we just pass the collection information and property to use in XAML and Silverlight takes care of traversing through the collection and building each row and putting the values property. Angular behaves same way except except instead of just pointing to the collection as itemssource, in angular, you will write the ‘foreach item in collection’ in the element instead of just the collection. Other than that everything from programming side is same. With that lets look at the view. The main difference is in the view, so lets make sure we understand it.

1 <!DOCTYPE html> 2 <html ng-app> 3 <head> 4 <title></title> 5 </head> 6 <body> 7 <div ng-controller="TemplateCtrl"> 8 <select ng-model="SelectedItem"> 9 <option ng-repeat="student in Students"> 10 {{student.Id}}-{{student.Name}} 11 </option> 12 </select> 13 </div> 14 <script src="https://ajax.googleapis.com/ajax/libs/angularjs/1.0.1/angular.min.js"></script> 15 <script src="Scripts/TemplateCtrl.js"></script> 16 </body> 17 </html>

If you are following my previous blogs, you should be ok till line (8). Line (8) specifies that you are creating a list box (HTML – Select) and ignore the rest in line(8) for now. Line (9) – (11) specifies, what are the things goes into each and every options.

<option ng-repeat="student in Students">

In line (9) there is a new directive that we haven’t used before. ng-repeat, tells angular to create individual element for each and every object in a collection. In this example, angular will create individual option element for every object in ‘Students’ collection based on the template specified in line (10). So if we are going by the collection we created in the Silverlight view model, there are 3 students which means, Angular will create 3 option elements. Line (10) is a simple template, which does nothing but a simple one way binding of Id and Name properties of student class.

ViewModel:

As you can expect, most of the work is in the View since template work is UI related and ViewModel does not have any idea about templates. So our view model looks like the following

1 function TemplateCtrl($scope) { 2 $scope.Students = [ 3 { Id: "1", Name: "First", Grade: "A" }, 4 { Id: "2", Name: "Second", Grade: "B" }, 5 {Id: "3", Name: "Third", Grade: "C"}]; 6 }

I skipped ‘SlectedItem’ on purpose for now.

Silverlight to Angular – 3 (Commands)

In Silverlight, we use Commands to do clean separation of View and ViewModel. If we were not using commanding, we will end up creating code behind code to handle the events fired by the controls and then publish the message from view to viewmodel or call viewmodel method from view. Either way, there is unnecessary code in code behind. With command, we can bind the command to a control event using magic black box (in my case Jounce or your ICommand implementation) which will take care of the wiring control event directly to viewmodel method, leaving our code very clean.

We will reuse the code we did in the last blog since it already has commanding implementation. If you want to know more about how to do commanding, please take a look at the Jounce Command documentation or one of my old blog on commanding.

Problem: Display number of times a button is clicked.

I am not going to explain the Silverlight solution here since it is already explained here. Let’s look at the AngularJS solution here since I conveniently skipped it in the previous blog.

View:

1 <!DOCTYPE html> 2 <html ng-app> 3 <head> 4 <title></title> 5 </head> 6 <body> 7 <div ng-controller="Controller"> 8 Number of Clicks:{{NumberOfClicks}} 9 <button ng-click="onClick()">Click Me</button> 10 </div> 11 <script src="https://ajax.googleapis.com/ajax/libs/angularjs/1.0.1/angular.min.js"></script> 12 <script src="Scripts/Controller.js"></script> 13 </body> 14 </html>

In this example we are interested in line (9). Angular provides a cool directive ‘ng-click’ which will listen to the click event and calls a function in the controller or if it is an expression then it evaluate the expression. It is as simple as that. So in Angular, if you want to use commanding to do clean separation of view and controller, all you have to do is use ng-click directive on a button. From view model perspective, the function view is calling nothing more than just another function and nothing special about it. There are bunch of APIs you can use to create this commanding behavior on different controls and you can find them all here in Angular API directive.

Controller:

1 function Controller($scope) { 2 $scope.NumberOfClicks = 5; 3 $scope.onClick = function() { 4 $scope.NumberOfClicks = $scope.NumberOfClicks + 1; 5 }; 6 }

In Silverlight, not only we can execute the action through command, we have another option enable the command or not. This can be achieved using ng-disabled directive. Will look at how to use that in the following example. One benefit in Angular is that you can pass as many parameters as you want in the function call instead of just one in Silverlight. Let’s take a look at a sample where we can pass multiple parameters in function call.

Following example allow user to enter two numbers and perform an addition and display result. When the user enters non numeric number we want to disable the ‘Sum’ button.

View:

1 <!DOCTYPE html> 2 <html ng-app> 3 <head> 4 <title></title> 5 </head> 6 <body ng-controller="Controller"> 7 First : <input ng-model="numberOne"/><br/> 8 Second: <input ng-model="numberTwo"/><button ng-disabled="IsValid(numberOne, numberTwo)" 9 ng-click="onClick(numberOne, numberTwo)">Sum</button><br/> 10 Sum: {{sum}} 11 <script src="https://ajax.googleapis.com/ajax/libs/angularjs/1.0.1/angular.min.js"></script> 12 <script src="Scripts/Controller.js"></script> 13 </body> 14 </html>

Both first and second number are two-way binding since the user change need to be propagated to model. On button click, we are using ng-click directive to call ‘onClick’ function in the controller and we are passing two parameters numberOne and numberTwo from the UI. If you notice, we also have another directive called ng-disabled, this will make the element disable if it return associated function from control returns false. If the input data collection is a form then you can enable and disable form submit button using Form.$validate.

Controller:

This is nothing but simple java script code which has variable assignments and a function call.

1 function Controller($scope) { 2 $scope.numberOne = 0; 3 $scope.numberTwo = 0; 4 $scope.sum = 0; 5 $scope.onClick = function(first, second) { 6 $scope.sum = Number(first) +Number(second); 7 }; 8 $scope.IsValid = function(first, second) { 9 return !(isNumber(first) && isNumber(second)); 10 }; 11 function isNumber(n) { 12 return !isNaN(parseFloat(n)) && isFinite(n); 13 } 14 }

One another point of interest along the line of ng-click is about other events from other elements. Take a look at this stack overflow question and answer. At the end, there is a comment by Tim Steward which is very interesting. He pointed out that if you do not see any ng- function for the element you are working on, his suggestion is to use Angular-UI

Silverlight to Angular – 2 (Data Binding)

One of the main features in Silverlight is binding. There are two ways you do data binding. ‘One way’ or ‘two way’ data binding. There is one more ‘onetime’, I am skipping it on purpose here. Let’s first see what they are and when do you use them and then see its associated implementation in both Silverlight and Angular.JS

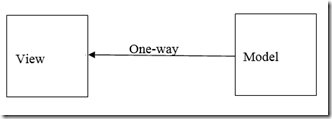
One-way: As the name suggests, as the data in data model changes, the changes are reflected in the View. When it is a one way data binding, user is not allowed to change the value in the view. It is meant to be showing the data coming from the model only. The read only controls are the excellent candidates for this kind of binding. This eliminates the overhead of two way binding.

image

Problem: Display number of times a button is clicked using one-way binding.

Silverlight:

View: For our problem, we need three controls.

  1. A text block with text specifying the ‘Number of clicks:’
  2. A text block which displays number of clicks itself.
  3. A button to click to modify the data.
1 <TextBlock Grid.Row="0" Grid.Column="0">Number of Clicks: </TextBlock> 2 <TextBlock Grid.Row="0" Text="{Binding NumberOfClicks, Mode=OneWay}" Grid.Column="1"/> 3 <Button Grid.Column="1" Grid.Row="1" Command="{Binding ClickMe}" CommandParameter="">Click me</Button>

ViewModel: We have a public property called ‘NumberOfClicks’ which is what bound to our text block to show number of times the button clicked. The second one is IActionCommand to trigger click event for the button. Every time button clicked, we increment the counter and raise the property changed event so that view can pick up the modified value.

1 [ExportAsViewModel(typeof(MainPageViewModel))] 2 public class MainPageViewModel:BaseViewModel 3 { 4 public IActionCommand<string> ClickMe { get; private set; } 5 private int _numberOfClicks = 0; 6 public int NumberOfClicks 7 { 8 get { return _numberOfClicks; } 9 set { _numberOfClicks = value; RaisePropertyChanged(()=>NumberOfClicks); } 10 } 11 12 public MainPageViewModel() 13 { 14 ClickMe = new ActionCommand<string>(p=> NumberOfClicks = NumberOfClicks+1); 15 } 16 }

Angular:

In Angular, to achieve one way binding, i.e., $scope -> view, all you do is to use ng-bind directive instead of ng-model. Alternate solution is to use the default {{variable}} notation, which also behaves same way as the ng-bind. I prefer {{variable}} approach. Here is an example which demonstrate one way binding using ng-bind.

View:

1 <!DOCTYPE html> 2 <html ng-app> 3 <head> 4 <title></title> 5 </head> 6 <body> 7 <div ng-controller="Controller"> 8 Number of Clicks:{{NumberOfClicks}} 9 <button ng-click="onClick()">Click Me</button> 10 </div> 11 <script src="https://ajax.googleapis.com/ajax/libs/angularjs/1.0.1/angular.min.js"></script> 12 <script src="Scripts/Controller.js"></script> 13 </body> 14 </html>

Line (8) is the one way binding. Even though ng-bind was not specified, it is the default binding. So you do not explicitly specify the ng-bind and I prefer to stay with {{}} approach.

ViewModel/Controller:

1 function Controller($scope) { 2 $scope.NumberOfClicks = 5; 3 $scope.onClick = function() { 4 $scope.NumberOfClicks = $scope.NumberOfClicks + 1; 5 }; 6 }

[Note: When you run the code, if the number is not incrementing then, one possibility is that, you might not have ‘()’ next to the onClick function in the HTML. Been there done that.]

Two-way: This is the standard and most used data binding. In this type of binding, when a data in data model changes, the changes reflected in View. In the same way, user is allowed to change the data in view and the change pushed to Model. In my opinion this is what made Silverlight so awesome and now it carries to Angular.

image

Problem: Get name from user and provide a greeting to the user. Allow user to add ‘!’ to the end of the name using a button.

Silverlight: For our problem we need three controls

View:

  1. A text block which display ‘Enter Name’.
  2. A text box to get user name.
  3. A text block to display ‘Hello {name}’.
  4. A button to add ‘!’ char to the name, which should modify both the (2) and (3) control values.
1 <TextBlock>Name: </TextBlock> 2 <TextBox Grid.Column="1" Text="{Binding Name, Mode=TwoWay}"></TextBox> 3 <Button Command="{Binding ClickMe}" CommandParameter="" Grid.Column="2">Add !</Button> 4 <TextBlock Grid.Row="1" Text="{Binding HelloName}"></TextBlock>

If you notice line (2) the text box binding ‘Name’ is set to ‘TwoWay’, which means, user is allowed to enter data which will change the viewmodel, but if the data changes in the model, it get reflected back on the view as well.  When you run the code, you will notice, when user enters ‘Unni’ in the name and press the button, it not only display ‘Hello Unni!’ in the text block in line (4) but also changes the text box (line 2) to ‘Unni!’. In this example, line (4) is still one way, so when data changes in the model, the change will get reflected in the view.’

ViewModel:

1 [ExportAsViewModel(typeof(MainPageViewModel))] 2 public class MainPageViewModel:BaseViewModel 3 { 4 private string _name; 5 public string Name 6 { 7 get { return _name; } 8 set 9 { 10 _name = value; 11 RaisePropertyChanged(() => Name); 12 } 13 } 14 public IActionCommand<string> ClickMe { get; private set; } 15 16 private string _helloName; 17 18 public string HelloName 19 { 20 get { return _helloName; } 21 set 22 { 23 _helloName = value; 24 RaisePropertyChanged(() => HelloName); 25 } 26 } 27 28 public MainPageViewModel() 29 { 30 ClickMe = new ActionCommand<string>(Clicked); 31 } 32 33 public void Clicked(string obj) 34 { 35 if (!Name.EndsWith("!")) 36 Name += "!"; 37 HelloName = "Hello " + Name; 38 } 39 }

[Note: If you have trouble with the code, make sure, all the properties have RaisePropertyChanged event in it. Also make sure the button click command name matches the command in the view model. The last part make sure all the exports attributes are marked properly]

Angular:

By default, if you do not specify ng- in the element, then one way binding is assumed. It means, whenever you use {{variable}}, it is considered one way binding. Anytime data change happens in the controller, view gets the modified data. $scope -> view. On the other hand if you specify ‘ng-model’ attribute in the element, it is considered two way binding. It means, user changes will be pushed to model and any model changes will be pushed to view. $scope <-> model.

View:

1 <!DOCTYPE html> 2 <html ng-app> 3 <head> 4 <title></title> 5 </head> 6 <body> 7 <div ng-controller="controller"> 8 Name: <input ng-model="Name"/> 9 <button ng-click="onClick()">Click Me</button> 10 <br />{{HelloName}} 11 </div> 12 <script src="https://ajax.googleapis.com/ajax/libs/angularjs/1.0.1/angular.min.js"></script> 13 <script src="scripts/controller.js"></script> 14 </body> 15 </html>

Line (8) is a two way binding to a variable ‘Name’ in the $Scope. It means, when user enters a value in the input, the user entered value get pushed to the $scope variable Name. On the other hand, line (10), when ever there is a value change to ‘HelloName’ variable in $scope, it get pushed to the view.

ViewModel/Controller: (Going forward, I am going to refer this as Controller instead of ViewModel).

1 function controller($scope) { 2 $scope.Name = ""; 3 $scope.HelloName = ""; 4 5 $scope.onClick = function () { 6 debugger; 7 if ($scope.Name[$scope.Name.length - 1] !== "!") 8 $scope.Name = $scope.Name + "!"; 9 $scope.HelloName = 'Hello ' + $scope.Name; 10 }; 11 }

Initially when the HTML is rendered in the browser, both Name and HelloName will have empty string. When the user enters a value, say ‘Unni’ in the input box and click on ‘Click Me’ button, controller executes ‘onClick’ function and sets the Name to ‘Unni!’ (note ‘!’ at the end) and make ‘HelloName’ as ‘Hello Unni!’. So both the variables ‘Name’ and ‘HelloName’ changed in the model so the changes pushed back to view. Now if you notice, your input changed to Unni! Instead of Unni, thus making variable ‘Name’ two way binding. While HelloName pushed to view with new value making it one way binding.

So the bottom line is, if you use ‘ng-model’, it is two way binding otherwise it is one way binding.